Blocking Ads with Pi-hole in Kubernetes
May 25th 2020, 2:36pm
5 min read
One of the common things people do with a vanilla Raspberry Pi is to use it exclusively to
host Pi-Hole. If you haven’t heard of Pi-Hole, it’s essentially a
service that blocks advertisements via DNS. Imagine a /etc/hosts file with a gigantic
list of domains belonging to ad networks and forcing them to point to 0.0.0.0.
The simpler alternative to this approach is using browser extensions like Adblock Plus. To cover your entire network however, you would have to install an extension on every browser on every device, consuming memory and having to manage individual block lists separately. Mobile devices and apps also add to the decentralisation.
Since I already have an operational Kubernetes cluster, I wanted to see how different it would be managing Pi-Hole as a microservice rather than installed directly on a Pi.

Deploying to Kubernetes
Pi-hole already has images published on their Docker
Hub so the deployment manifest is simple,
requiring two areas of persistent storage for configuration data and the admin password to be configured in the environment variable WEBPASSWORD.
apiVersion: v1
kind: PersistentVolumeClaim
metadata:
  name: pihole-data
spec:
  accessModes:
  - ReadWriteOnce
  resources:
    requests:
      storage: 1Gi
---
apiVersion: v1
kind: PersistentVolumeClaim
metadata:
  name: pihole-dnsmasq
spec:
  accessModes:
  - ReadWriteOnce
  resources:
    requests:
      storage: 500Mi
---
apiVersion: apps/v1
kind: Deployment
metadata:
  name: pihole
  labels:
    app: pihole
spec:
  selector:
    matchLabels:
      app: pihole
  template:
    metadata:
      labels:
        app: pihole
    spec:
      containers:
      - name: pihole
        env:
        - name: WEBPASSWORD
          value: a-strong-password-here
        image: pihole/pihole:latest
        volumeMounts:
        - mountPath: /etc/pihole
          name: pihole-data
        - mountPath: /etc/dnsmasq.d
          name: pihole-dnsmasq
      volumes:
      - name: pihole-data
        persistentVolumeClaim:
          claimName: pihole-data
      - name: pihole-dnsmasq
        persistentVolumeClaim:
          claimName: pihole-dnsmasq
We’ll then need to expose the admin console on port 80 and the DNS service on port 53, but
this needs to be done on both TCP and UDP. Kubernetes does not allow you to create a
single service that handles both TCP and UDP, so we will have to create 2 services, then
force our load balancer to host them on the same external IP. I’m using Metal LB, which
supports this via the addition of
an allow-shared-ip annotation to both services and supplying a common identifier, which
I will list as pihole-svc.
apiVersion: v1
kind: Service
metadata:
  name: pihole-tcp
  annotations:
    metallb.universe.tf/allow-shared-ip: pihole-svc
spec:
  type: LoadBalancer
  selector:
    app: pihole
  externalTrafficPolicy: Local
  ports:
  - name: pihole-admin
    port: 80
    targetPort: 80
    protocol: TCP
  - name: dns-tcp
    port: 53
    targetPort: 53
    protocol: TCP
---
apiVersion: v1
kind: Service
metadata:
  name: pihole-udp
  annotations:
    metallb.universe.tf/allow-shared-ip: pihole-svc
spec:
  type: LoadBalancer
  selector:
    app: pihole
  externalTrafficPolicy: Local
  ports:
  - name: dns-udp
    port: 53
    targetPort: 53
    protocol: UDP
Once you kubectl create -f the manifests, you should see the single pod start up and the
load balancer assign a shared IP for the services.
NAME        TYPE          CLUSTER-IP    EXTERNAL-IP  PORT(S)                   AGE
pihole-tcp  LoadBalancer  10.121.27.29  10.0.0.77   80:30600/TCP,53:31765/TCP  1m
pihole-udp  LoadBalancer  10.103.12.15  10.0.0.77   53:32637/UDP               1m
Administration
You can now visit the admin console at http://10.0.0.77 (the IP assigned above) and login
using the password defined in the deployment. Pi-hole is actually usable right away
but you can choose to override some settings like upstream DNS in Settings > DNS or add
more block lists to the default in Group Management > Adlists. You can Google for
Pi-Hole lists where you will find many, many different lists you can add directly to
your Pi-Hole. Once you add new lists, you need to go to Tools > Update Gravity to
download the contents from those lists into your local database. Pi-hole will periodically
do this for you to refresh any changes in those lists.
Testing and Go-Live
To test if Pi-Hole is working, just perform a nslookup google.com 10.0.0.77 and check
that it resolves and appears in your admin console’s Query Log page. Once you’re
satisfied, go to your DHCP server (usually in your home router) and override the DNS
server to 10.0.0.77 (whatever your LB assigned). All new devices obtaining new DHCP
leases will henceforth use Pi-Hole to resolve hostnames and block matching domains (and
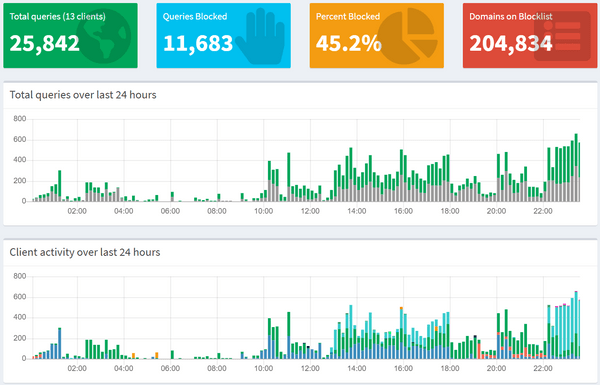
associated ads). You can then get some interesting metrics back in the admin console after
using it for a day or so.

Adding DHCP
Now that Pi-Hole has relieved your home router’s duties in resolving DNS, what if you also
wanted to relieve it of IP assignment duties? You’ll be happy to know you can centralise
this as well in Pi-Hole and it comes out-of-the-box. Unfortunately, since we’re in the
Kubernetes world, some extra work is involved. This “breaks” the container model a little
and adds some security considerations, so exercise your discretion. The core problem here
is that if Pi-Hole sits in a container, it cannot listen to DHCP requests on Layer 2
happening outside the cluster’s internal network. Hence, it will need access to the host
network as well as root access on the host to listen on ports 53 and 67. The actual
work involved is not too difficult: just add hostNetwork and securityContext to your
deployment.
apiVersion: apps/v1
kind: Deployment
metadata:
  name: pihole
  labels:
    app: pihole
spec:
  selector:
    matchLabels:
      app: pihole
  template:
    metadata:
      labels:
        app: pihole
    spec:
      containers:
      - name: pihole
        securityContext:            privileged: true        env:
        - name: WEBPASSWORD
          value: a-strong-password-here
        image: pihole/pihole:latest
        volumeMounts:
        - mountPath: /etc/pihole
          name: pihole-data
        - mountPath: /etc/dnsmasq.d
          name: pihole-dnsmasq
      hostNetwork: true      volumes:
      - name: pihole-data
        persistentVolumeClaim:
          claimName: pihole-data
      - name: pihole-dnsmasq
        persistentVolumeClaim:
          claimName: pihole-dnsmasq
You’ll then need to edit your UDP service to expose the DHCP port.
apiVersion: v1
kind: Service
metadata:
  name: pihole-udp
  annotations:
    metallb.universe.tf/allow-shared-ip: pihole-svc
spec:
  type: LoadBalancer
  selector:
    app: pihole
  externalTrafficPolicy: Local
  ports:
  - name: dhcp-udp    port: 67    targetPort: 67    protocol: UDP  - name: dns-udp
    port: 53
    targetPort: 53
    protocol: UDP
You can then head into the admin console under Settings > DHCP and enable the DHCP
server, setting up your desired range and any static leases. Once this is enabled,
remember to disable your router’s DHCP server. Now you have a single control plane to
manage all local and remote hostname resolution. Happy ad-free life!